

How To Draw A Perfect Nose
The Nuts of the Nose
For some reason, when it comes to noses, people struggle. Peradventure this is because a nose is an irregular course - it'due south not a elementary shape similar a circle and information technology's not quite a triangle either. It's not every bit hard to draw realistic noses equally one may think. It's actually rather simple. All information technology takes is 4 lines and then the rest is adding value. Don't fall into the trap of thinking that drawing noses is hard.
Many people accept incorrectly learned how to draw a nose. When you lot learn something incorrectly, it is even harder to larn how to do information technology correctly. This is true of annihilation, non simply cartoon. Many of u.s.a. take been taught to describe that "Fifty" shape or perhaps the "w" shape with an actress "u" when we draw a olfactory organ.
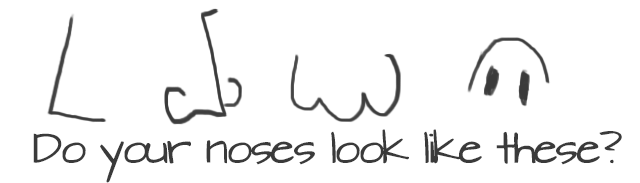
Drawing noses this way is so far from drawing them realistically. If you are going for a cartoon nose, then that may exist a proficient management to become. Only for a realistic nose, you lot must really observe your subject.
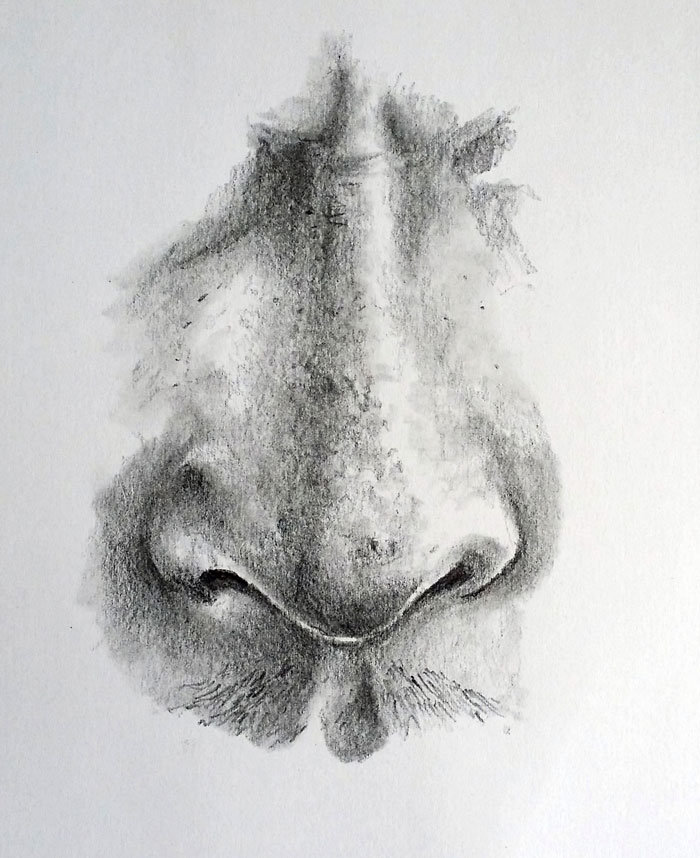
Here's a look at the finished cartoon from the video above...
The Key is Observation
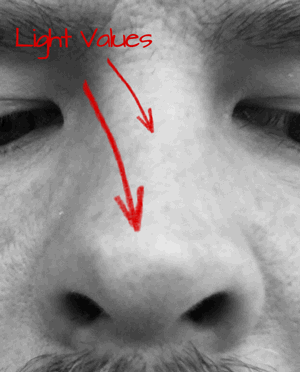
You must closely discover your discipline when you describe anything. Drawing noses realistically involves studying the values. The values are what gives us the impression and illusion of the grade. Make sure that yous include a total range of value when you draw a nose.
 Drawing lines volition assistance to establish the shape of the nose, but it'south the values that will atomic number 82 to the illusion of form that you probably desire in you drawing.
Your drawing must include the darkest shades and the lightest tints and the grays in between. Keep in listen that no ii noses will be the same. Ascertainment is really the biggest hugger-mugger when it comes to drawing.
Try to pinpoint the locations on the nose where these values are located and notice the subtle changes that happen in the highlights (low-cal values), midtones (centre values), and the shadows (dark values).
Drawing a Nose from a Frontal View
We'll explore several different options for drawing a nose in this lesson and look at a number of examples. It makes sense to wait at drawing the nose from a frontal view first. This way, we can better understand the structure and what we should wait for and include in our drawing.
Before drawing any lines, nosotros'll first examine the course of the nose and how we can simplify it into a system of planes.
Understanding the Planes of the Nose
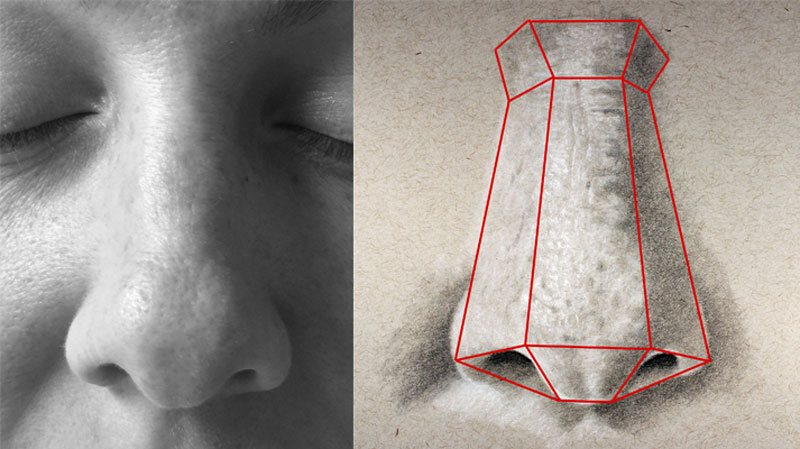
A nose tin can be simplified into basic planes. Y'all may recollect of a chiseled course to better understand the planes. Remove the curvature of the nose from your heed and simplify the form into rigid flat planes.
Recognizing the planes not only helps us to draw the form, simply it likewise helps u.s. to understand where we should add shading. It is the shading, or value range, that ultimately leads to the illusion of a three-Dimensional class.
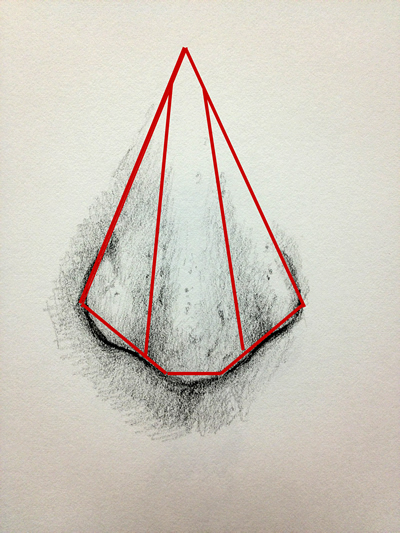
In the image below, yous'll see an instance of a nose from a frontal view, simplified into basic planes. As the form changes direction in space, it creates a new airplane. In that location are three planes designated for the tiptop, three for the eye, and three underneath.
In the beginning stages of the drawing, y'all may observe it helpful to draw these planes start. This way, y'all can focus on the form earlier drawing any of the lines for the nostrils or adding tone.
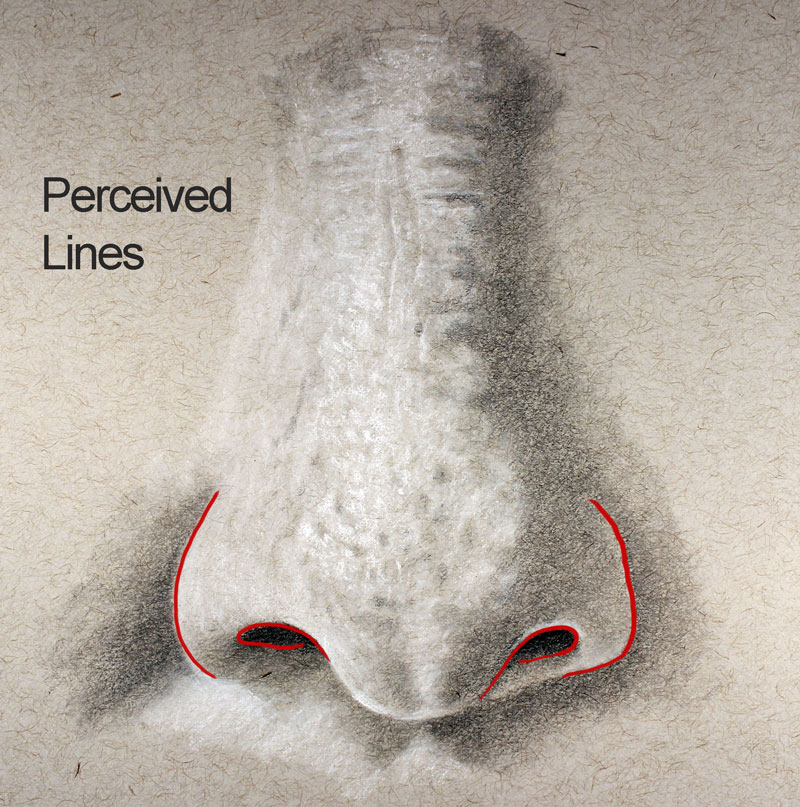
Cartoon the Perceived Lines
When well-nigh of us learn to draw, nosotros start by drawing lines. We utilize lines to define the boundaries of objects and to add details. So it'due south only natural to look for lines when we describe whatsoever object.
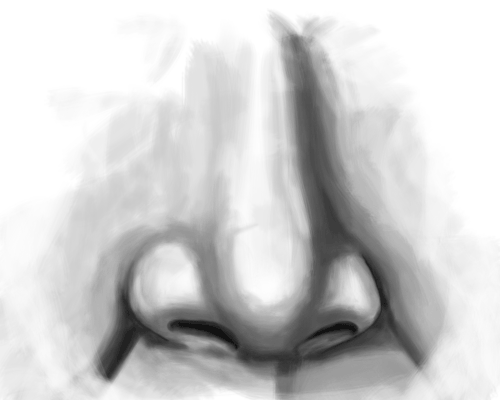
A nose, still, doesn't feature strongly defined lines. Our mind simplifies changes in value or contrast into "perceived lines". For a nose, these areas include the shapes of the nostrils and the outer edges of the nostrils. This is simply considering nosotros notice potent dissimilarity in value in these locations. In reality, the value changes gradually, instead of creating a defined line.
We can use the planes of the nose to position the perceived lines that we run into. Using the outer boundaries of the planes, we can mark the outer edges of the nostrils. We tin can also use the lesser planes to position the shapes of the nostrils.
Shading the Nose
Understanding the planes of the olfactory organ helps the states to draw the basic structure and position the "perceived lines", just the planes also perform another of import task. Nosotros can use these planes to decide the locations of value.
In this case, the light source originates from the upper left corner. This produces lighter values on the left side of the nose, closer to the light source. This means that the plane that faces the light source volition be lighter. Darker values are plant on the opposite plane on the right side of the nose.
Since our light source is also coming from above, yous'll notice that the planes underneath the nose are also darker. There is, nonetheless, a slight highlight in areas here.
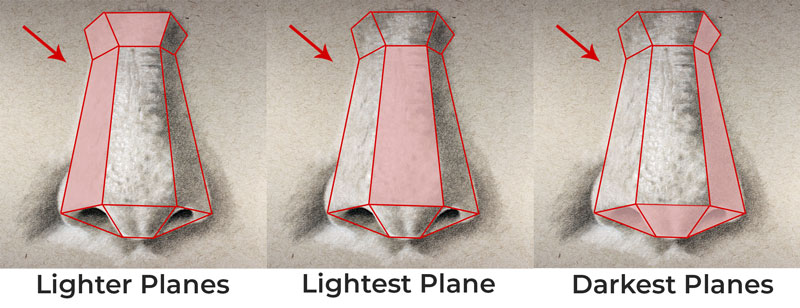
The span of the olfactory organ protrudes outward. As a full general dominion, near objects that protrude receive more light and are usually lighter in tone. They too usually produce a shadow underneath. In this case, the bridge of the olfactory organ is receiving the strongest light. The values developed here should be slightly lighter than the values establish on the left aeroplane of the olfactory organ.
Now that nosotros accept a basic understanding of the locations of value and how dark or light they should be, we tin can begin the process of shading. Nonetheless, the term "shading" is somewhat confusing. It suggests that we are only addressing the dark values, or shades. In reality, the process of "shading" is the procedure of developing a full range of value. This means we should consider both the tints (light values) and the shades (night values) together.
If you're working on white paper, you may choose to leave the areas of highlight "open" or accost them with a very light awarding of graphite. If you are working on toned paper, as we encounter with this cartoon, you lot can add the highlights with a light drawing medium. In this case, a white charcoal pencil is used.
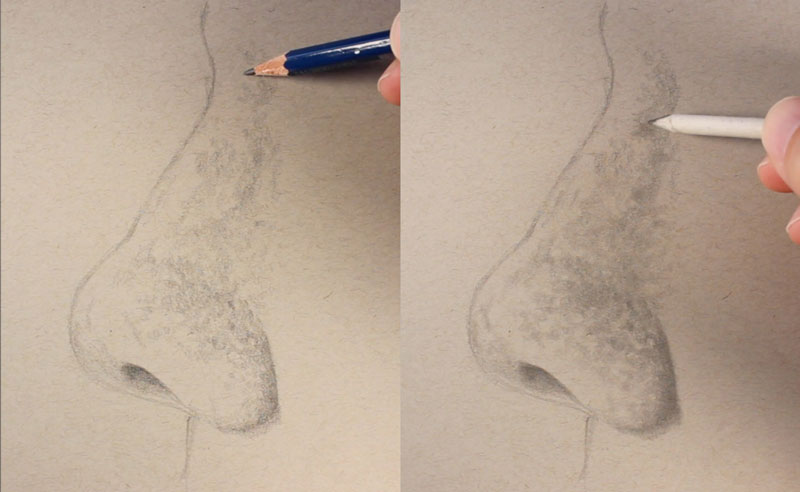
Prior to adding the highlights, we'll brainstorm with a light application of graphite using an H graphite pencil. This gives usa a starting signal.
A blending stump is so applied to smooth the texture and work the graphite cloth into the molar of the paper.
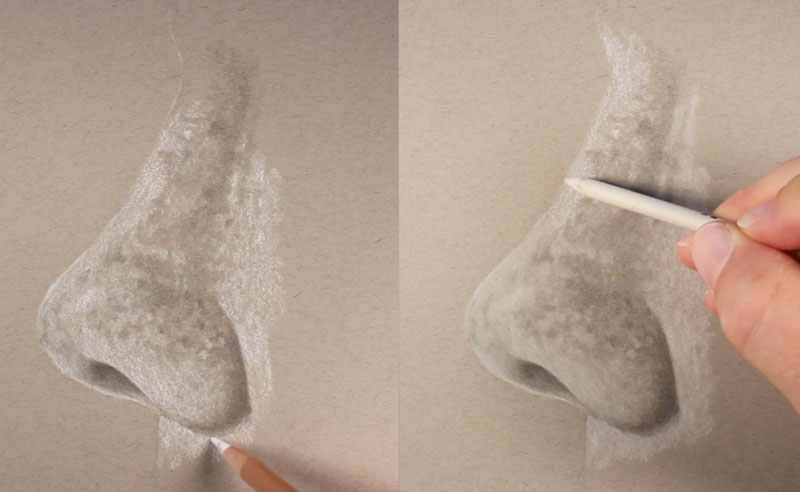
Once the locations of darker value are established with a low-cal awarding, we tin define the highlights with a white charcoal pencil. Again, this application is gently composite with a blending stump.
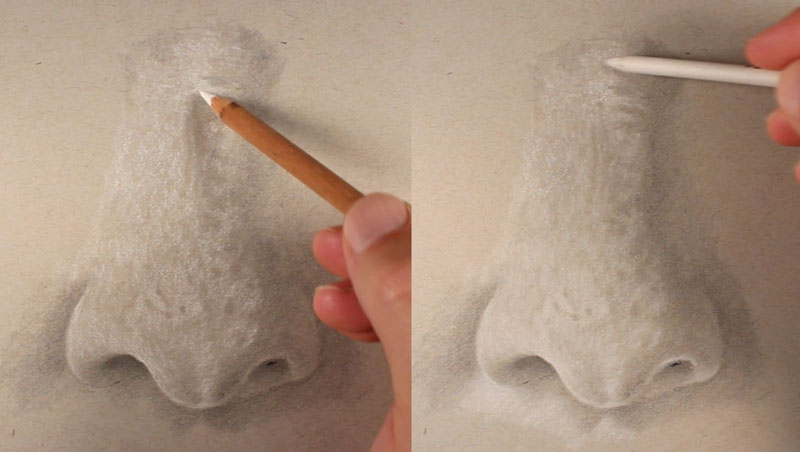
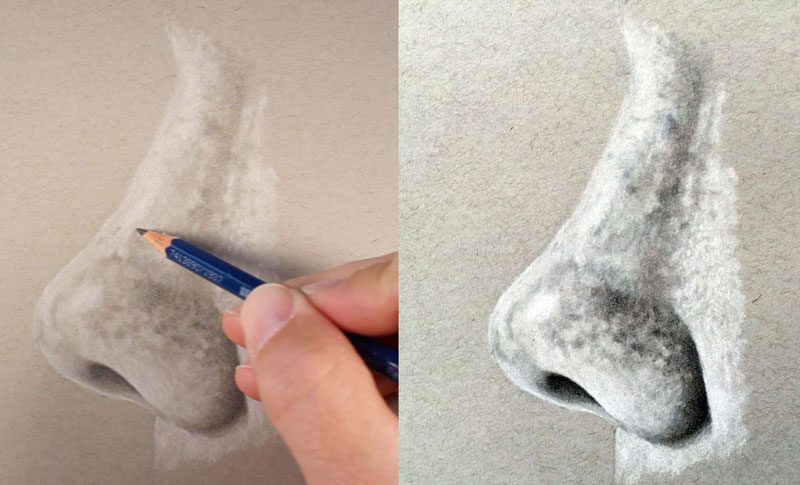
Then it'due south a affair of gradually concealment the shades to increase dissimilarity. A softer and darker, graphite pencil is used the darken the areas within the nostrils and the shadows that be on the right side and underneath the nose.
Nosotros tin can also continue to add highlights, if necessary, to extend the range of value and the dissimilarity. Equally applications are fabricated, they are gently blended with a blending stump. You'll notice that as the value is adult the texture of the nose is besides developed.

A more than in-depth video of this lesson, along with an illustrated ebook can be found in the class, "Portrait Cartoon the Smart Way".
How to Draw a Nose Pace past Step
Hither's the process that we outlined above, simplified and broken down into a step by step approach...
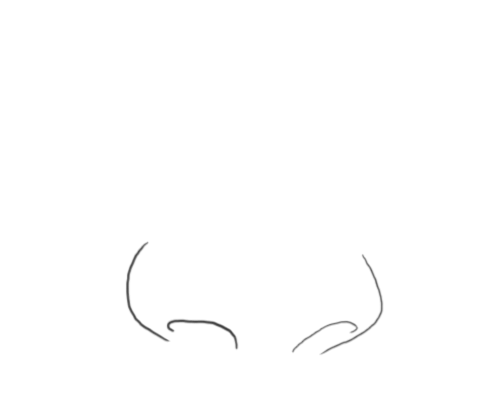
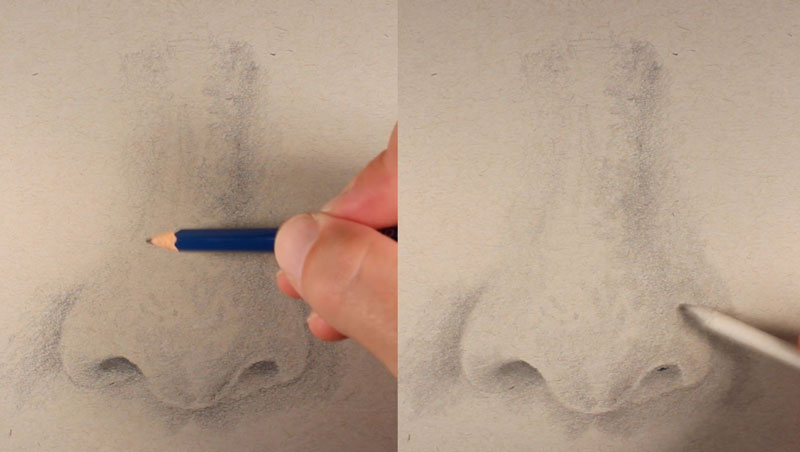
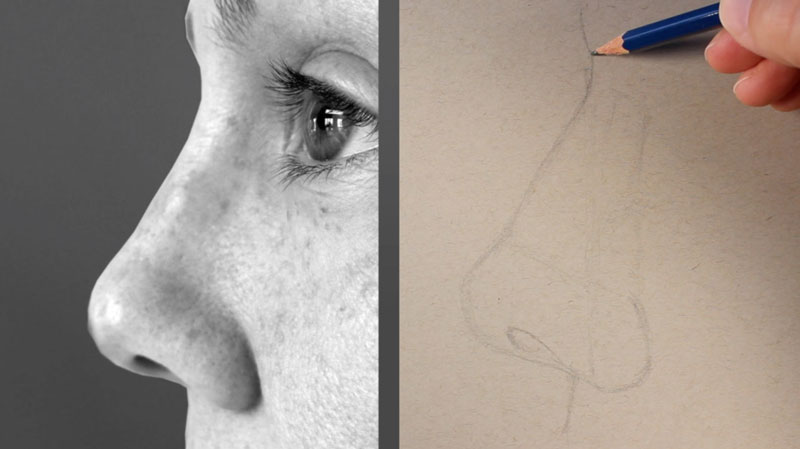
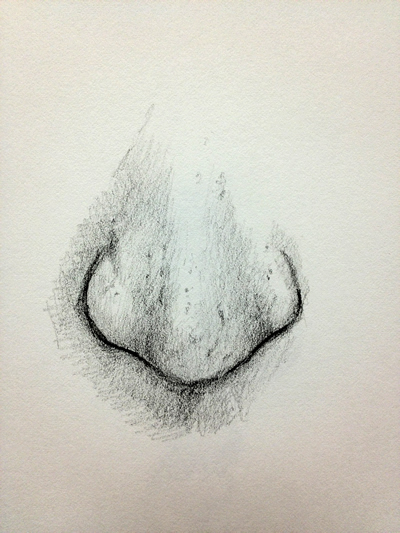
Begin your cartoon of a nose past drawing 4 lines. Ii lines are drawn for each nostril and so two more for each edge of the nose.
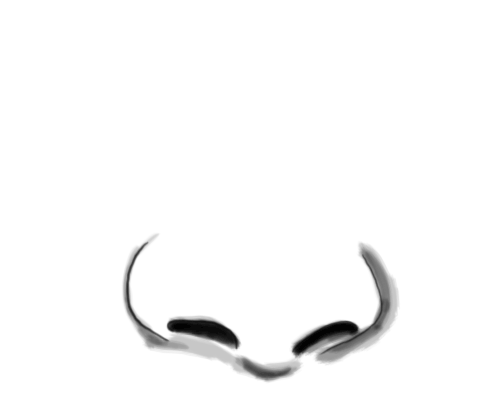
Now you can brainstorm to add darker values where the nose is shaded. Start with the areas that are the darkest and slowly get darker with your pencil.
Go on with adding shading to the nose to create the illusion of a low-cal source. Be careful non add more than lines. Instead, merely concentrate on light and dark areas.
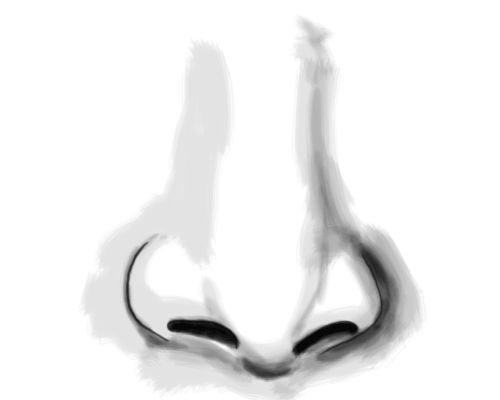
The more value that you add, the more your olfactory organ will look realistic. Areas of the olfactory organ that are light will look like they protrude, while areas that are dark will look like they become back in space.
Equally long as you continue looking for the dark and light areas on the nose, and draw what y'all run across, your nose will expect realistic.
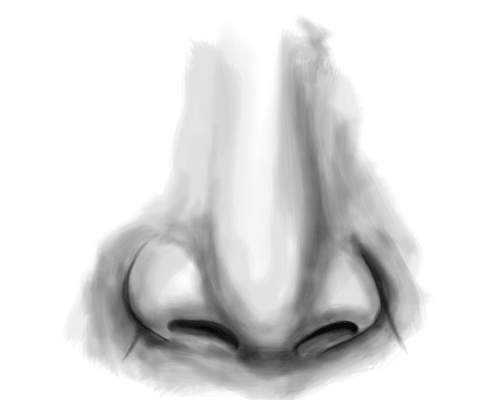
Once you have a basic idea of how to draw a olfactory organ from a frontal view, it'due south time to look at cartoon a nose from the side.
Drawing a Nose from the Side View (Profile)
At that place's more than 1 manner to draw a nose. In fact, since every nose is different, there are virtually unlimited ways to draw a nose. Next, we'll take a look at drawing a nose from a side view. This is unremarkably referred to equally a profile view.
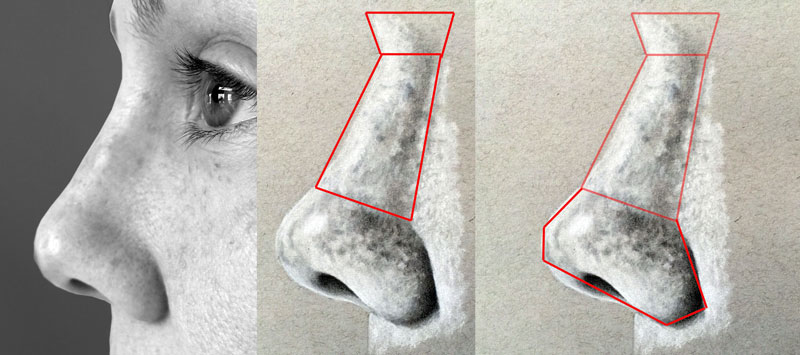
As we did with the frontal view, we'll beginning locate bones shapes. When cartoon a nose from this angle, it may be hard to place the planes, so basic shapes will suffice.
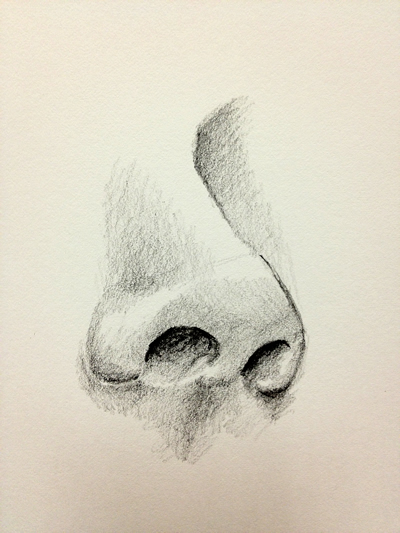
Expect for changes in spacial direction to find the most basic shapes. Equally we see below, the upper portion of the olfactory organ tin can exist simplified with two shapes. The lower portion of the nose is simplified into an organic shape that extends downward from the top ii shapes.
We'll draw these basic shapes showtime to define the form of the olfactory organ.
Next, we can draw the perceived lines that we discussed before forth with the outer contours. Later these lines are in identify, nosotros tin brainstorm the procedure of developing the value and texture.
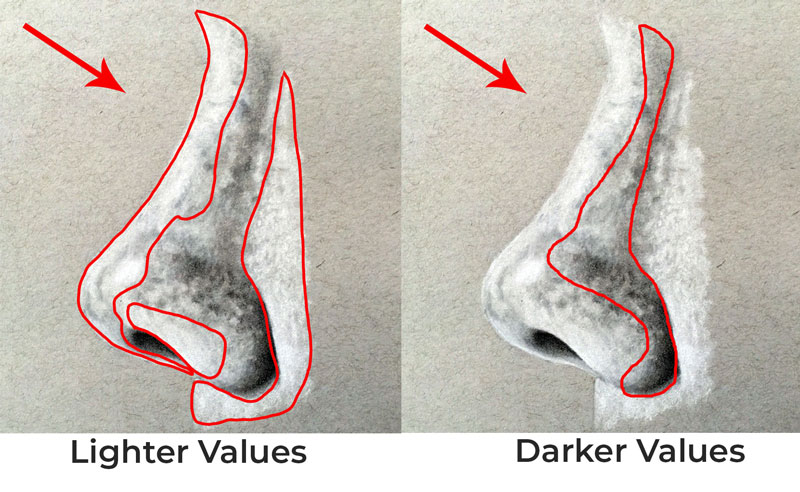
As nosotros develop the value range, we'll consider the light source. As nosotros see in this instance, the lite source originates from the left. This creates shapes of different tones on the nose. The span of the nose receives the most light. The cheeks are also receiving a off-white amount of low-cal. Curiously, the bottom of one of the nostrils is as well lighter. This is the result of calorie-free reflecting back up from beneath, producing an area of reflected highlight.
Every bit we did before, we'll beginning adding lite graphite applications to plant the shapes of the darkest value. These applications are blended with a blending stump to create a smooth texture.
And so nosotros can add the highlights. In this example, we're once again working on a toned drawing surface. This allows united states to add the highlights with a white medium similar white charcoal. After the initial highlights are added, we tin can alloy them as well.
Now we simply need to darken the value to create a full range and increase the dissimilarity in the drawing. Softer graphite pencils are practical and blended to gradually "push" the tonal range.
For more on this sit-in encounter the class, "Portrait Cartoon the Smart Way".
Drawing a Nose From Ascertainment - Put It Into Practice
Now that you've got the basic concept downwardly, it's fourth dimension to take your skills to an bodily subject field. This might exist a nose that y'all draw from life, or 1 that you draw from a photograph reference. Either way, the process of cartoon will heavily depend on observation.
When yous are observing a nose, look for the "planes" - or uncomplicated geometric shapes that stand for how the olfactory organ exists in space.
Take the post-obit cartoon for instance...
Now look at the planes that can exist easily fatigued to create the form of the nose...
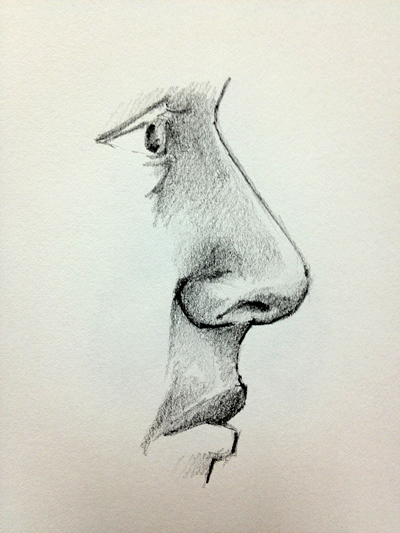
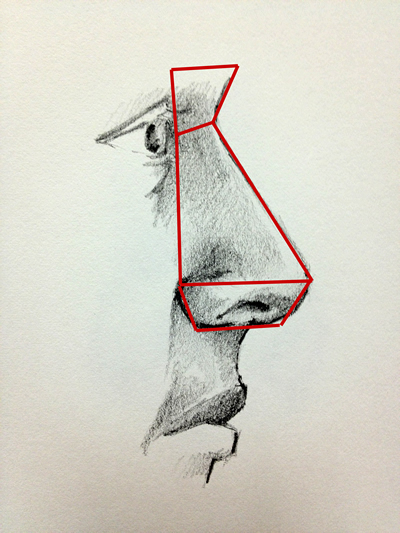
Hither'south another expect at the nose from the side view.
Hither is the same drawing with the planes highlighted...
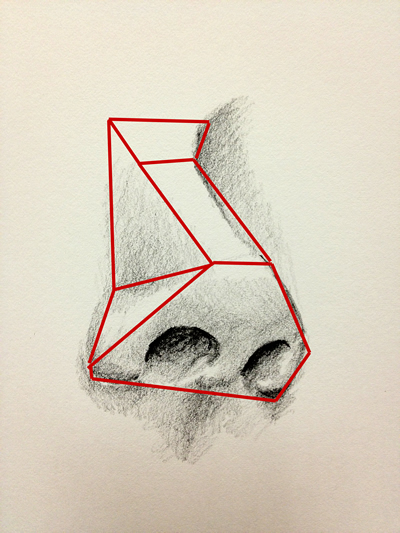
Certain angles of the nose can present challenges...
Simply hither again, if you break the olfactory organ downwardly into geometric planes, this angle is made easier to draw...
Conclusion
Now that we've had at look at several unlike noses, you are well equipped to draw your own. But call up the steps we took...
- Find and draw the planes.
- Describe the perceived lines of the nostrils and contours.
- Develop a range of value and texture.
Every bit e'er, take your time and exist patient. With practice, you lot'll principal the fine art of drawing noses.

How To Draw A Perfect Nose,
Source: https://thevirtualinstructor.com/graphitenose.html
Posted by: holcombworeuthe93.blogspot.com
0 Response to "How To Draw A Perfect Nose"
Post a Comment